How to grow kale in containers is simpler than most people expect, as long as you give the plant enough soil volume, steady moisture, and consistent feeding.
Kale is one of the easiest edible plants to grow in containers because it doesn’t need a massive root zone, it tolerates cool weather, and you can harvest it over a long stretch of time by picking leaves as you need them.
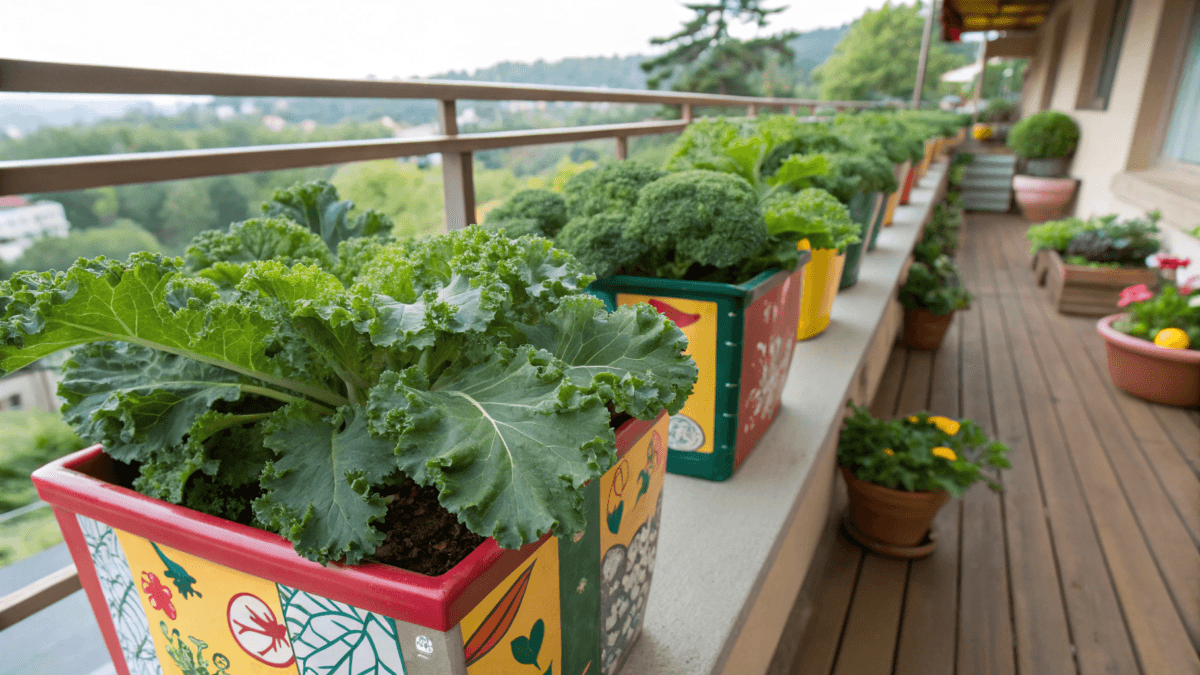
If you’ve got a balcony, patio, or even just a sunny corner by a door, you can grow a steady supply of tender kale in a pot as long as you choose the right container, use a good soil mix, keep watering consistently, and feed it lightly but regularly.
The biggest mistakes I see with container kale are pots that are too small, soil that drains poorly (or dries out too fast), and irregular feeding. Get those three things right, and kale becomes a “plant it once, harvest for weeks” kind of crop.
Quick setup (works for most balconies):
Use a 5-gallon pot per plant (or a container 12 inches wide and 8–12 inches deep), fill it with a 50/50 mix of potting mix + finished compost, plant in 6+ hours of sun (morning sun + afternoon shade in heat), and water when the top 1 inch is dry.
If you want the full start-to-finish overview (varieties, timing, spacing, pests, and harvesting), see How to Grow Kale.
Why Kale Works in Containers?
Containers work well for kale because they let you control the two things that cause most problems, like moisture and soil quality.

Key Advantages of Growing Kale in Pots
- Fibrous roots grow well in 8-12 inches of soil
- Pots allow better control over watering and drainage
- Containers can be moved to manage sun, wind, and heat
- Easier pest protection with netting or row covers
- No reliance on poor native soil
- Plants stay visible and easier to harvest regularly
Tradeoffs to Plan For
- Containers dry out faster than garden beds
- Nutrients wash out more quickly and require regular feeding
- Root zones heat up and cool down faster
- Small pots can stunt plants and toughen leaves
None of these are deal-breakers, but they mean container kale benefits from larger pots, better soil mixes, and a simple routine.
Choosing The Right Container Size For Kale
Pot size matters more than people think. Kale will survive in a small pot, but it won’t produce the way you want, and the leaves will get tougher faster.
Kale roots don’t need extreme depth, but they do need steady moisture and enough volume. For most varieties, a container that’s about 12 inches wide and at least 8-12 inches deep grows a much better plant than a smaller decorative pot.
Minimum Pot Size For One Kale Plant
For one full-size kale plant (curly kale, lacinato/dinosaur kale, Red Russian), I consider this the minimum:
- At least 3-5 gallons
- At least 10-12 inches wide
- At least 10-12 inches deep
Smaller containers work short-term, but production drops fast once roots fill the pot.
Fast sizing guide:
5 gallons = 1 kale plant (best long harvest)
10-15 gallons = 2-3 plants (steady picking, slightly smaller leaves)
You can get a smaller “baby leaf” harvest from a smaller container, but if you want a plant that keeps giving for weeks, start with 3-5 gallons per plant.
A 5-gallon pot is the sweet spot for most balconies because it holds moisture better and buffers temperature swings.
How Container Depth Affects Root Growth
Depth affects two things: root room and moisture stability.
A shallow pot dries out fast, and kale responds by stressing, slower growth, thicker leaves, and sometimes a bitter edge. A deeper container holds more soil volume, which means:
- More consistent moisture from day to day
- More stable root temperatures
- More nutrient “bank” in the pot
If you’re choosing between a wide, shallow bowl and a slightly narrower but deeper pot, kale usually does better in the deeper option.
When Larger Containers Perform Better
Bigger isn’t always necessary, but it helps in common real-life conditions:
- Hot balconies where pots bake in the afternoon sun
- Windy patios where evaporation is constant
- Infrequent watering (if you’re gone all day, or you travel)
- Multiple plants per container
If you have room, a 10-15 gallon container can grow 2-3 kale plants comfortably and will stay evenly moist much longer than individual small pots. That steadiness shows up as faster growth and more tender leaves.
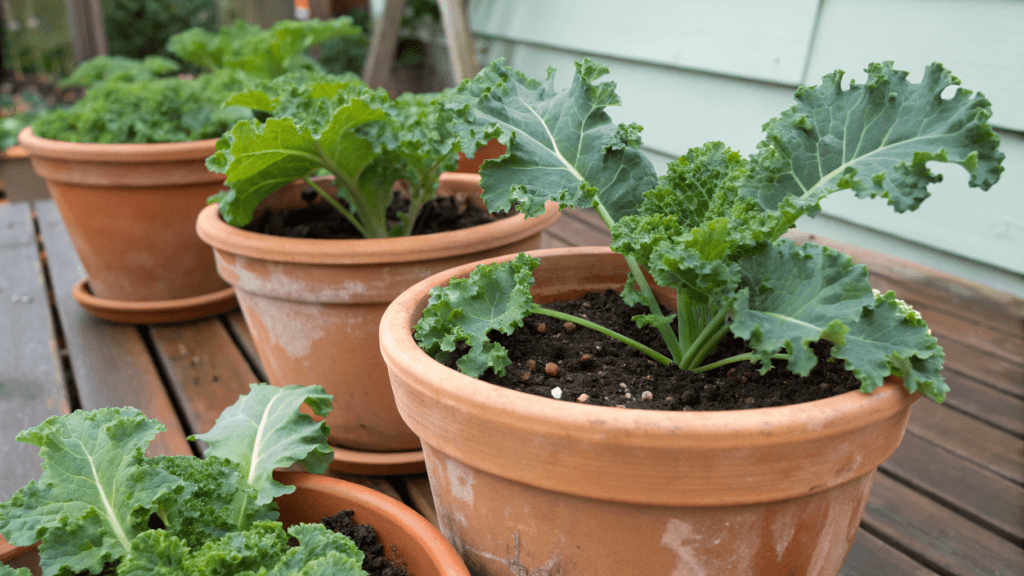
Best Pot Types For Growing Kale
Kale will grow in almost anything with enough volume and drainage. The “best” pot is the one that matches your watering habits and your balcony’s heat and wind.
Plastic Vs Terracotta Vs Fabric Pots
Each has a personality.
Plastic (or resin) pots
- Hold moisture well
- Stay lighter than terracotta
- Good for hot, dry balconies
- Dark plastic can heat up in direct sun; shade the pot or size up in hot locations.
Terracotta
- Breathes and dries faster
- Heavy and stable in the wind
- Great for people who tend to overwater
- Needs more frequent watering in summer heat
Fabric pots
- Air-prune roots and drain well
- Harder to overwater
- Dry out quickly in the wind and heat
- Best if you can water often and mulch the surface
If you’re new to container vegetables, plastic is usually the easiest starting point because it buys you time between waterings.
Drainage Tips For Container-Grown Kale
Kale likes even moisture, not wet feet. In containers, drainage is the difference between a thriving plant and a slow decline that looks like “mystery problems.”
Why Drainage Is Critical In Pots
In a garden bed, excess water can move downward through soil layers. In a pot, water has only one way out: the drainage holes. If water sits in the container, the roots lose oxygen and start to weaken.
Weak roots can’t feed the leaves properly, and the plant becomes more vulnerable to pests and leaf issues.
Drainage Hole Requirements
A good container for kale has:
- Several drainage holes, not just one
- Holes that are at least 1/4 inch wide
- A base that allows water to escape (not sealed tightly to the ground)
A saucer under a pot is fine, especially on balconies, but don’t let it stay full. After watering, empty the saucer or use pot feet/spacers so water doesn’t pool under the container.
Skip the old advice about putting rocks in the bottom. It doesn’t improve drainage, and it steals soil volume. Use more soil and a proper mix instead.
Watering Rule for Container Kale (Use This, Not a Schedule)
Water when the top 1 inch of the mix feels dry. Water slowly until you get runoff, then stop. If the pot is drying daily in warm wind, that’s normal, bigger pot + mulch makes it easier.
Signs Of Poor Drainage In Containers
Drainage problems show up in a few predictable ways:
- Leaves look dull, limp, or yellowing, even though the soil feels wet
- Growth is slow, and new leaves stay small
- Lower leaves yellow and drop more quickly than normal
- Soil smells sour or “swampy.”
- Fungus gnats show up around constantly wet soil
If you see these, fix the drainage first before adding fertilizer. Feeding a plant with struggling roots usually makes things worse.
Best Soil Mix For Growing Kale In Containers
Container kale does best in a light mix that holds moisture but drains fast. Skip garden soil in pots; it compacts and stays wet, which leads to root stress.
The same soil principles apply in the ground, too. For a deeper breakdown of texture, pH, and organic matter, see Best Soil for Growing Kale.
What a Good Container Mix Needs
- Air space for roots
- Even moisture retention
- Fast drainage
- Steady nutrient support
Kale Container Mix
- Kale Container Mix (simple + reliable)
- 1 part quality potting mix
- 1 part finished compost (or well-rotted composted manure)
- Optional: a small handful of perlite per gallon if the mix feels dense
A simple test: Water the pot thoroughly. The mix should absorb water evenly and start draining within a minute. If water sits on top or channels down the sides without soaking in, the mix needs improvement.
How To Plant Kale In Pots Step By Step
Kale can be direct-seeded, but for containers, I usually plant seedlings or starts. It gives you a strong head start and reduces gaps from poor germination.
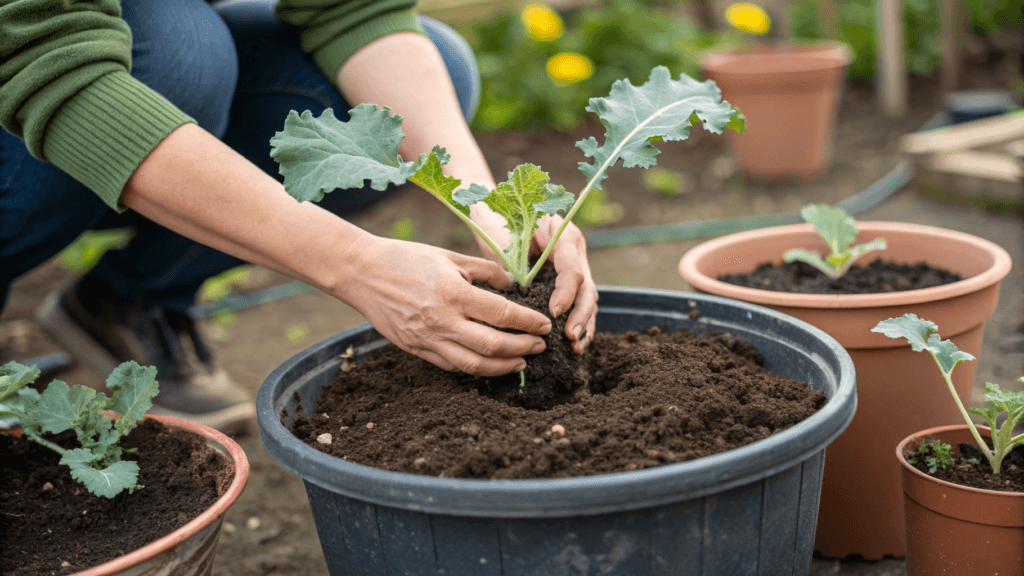
1. Filling The Container Correctly
Start with clean pots. If you’re reusing containers, rinse out old soil and scrub if there were disease issues last season.
Then:
- Fill with your soil mix to within 1-2 inches of the rim
- Gently firm the soil, don’t pack it tight
- Water the soil once before planting if it’s very dry (dry potting mix can repel water at first)
Leaving a little space at the top makes watering easier and keeps soil from spilling out.
2. Planting Depth And Positioning
Plant kale at the same depth it was in the nursery pot. The top of the root ball should sit level with the soil surface.
- For leggy seedlings, you can bury the stem slightly deeper, but don’t cover the growing point (the center where new leaves emerge).
- Position plants so the main stem is centered, not pressed against the pot edge. That helps the plant grow evenly.
If you’re direct-seeding, sow shallow:
- Press seeds into the surface about 1/4 inch deep
- Keep the top layer evenly damp until sprouts are up
3. Watering After Planting
Water slowly and thoroughly until water runs from the bottom. Then watch how the plant behaves over the next few days.
Right after planting, kale may droop for a few hours even if it’s watered. That’s normal transplant stress. If it’s still limp the next day, check sun intensity and moisture. On hot balconies, a newly planted seedling may need a day or two of gentle morning sun while it settles in.
4. Set in The Right Light
Set the pot where it gets 6-8 hours of sun (morning sun is ideal). In hot/reflective spots, give afternoon shade.
5. Thin (Only If You Direct-Seeded)
- Once seedlings have 2-3 true leaves, thin to the strongest plant.
- Don’t let seedlings stay crowded; they’ll stretch and struggle.
6. Add Mulch
After seedlings are established or transplants settle in (a few days), add your mulch layer, 1-2 inches of shredded leaves, straw, or fine bark
Even a thin layer helps keep soil evenly moist and reduces temperature swings
Fertilizing
Kale is a leafy crop, and leafy crops need steady nitrogen to keep producing. In containers, nutrients wash out with watering, so “one-time feeding” rarely works well.
I like a simple, consistent approach: Start with compost in the mix, then add light feeding regularly.
A practical routine:
Two easy options (choose one):
Option A (simplest): Mix a slow-release balanced fertilizer into the potting mix at planting, then do one light liquid feed monthly.
Option B (more control): Skip slow-release and do a light liquid feed every 2-3 weeks once established.
- At planting, compost in the soil mix is usually enough to carry the plant for the first 2-3 weeks.
- After it’s established, feed every 2-3 weeks with a balanced liquid fertilizer or fish/seaweed blend at label strength.
- If growth slows or leaves pale, increase to every 10-14 days during active growth.
What to watch for (so you don’t overdo it):
- Pale green leaves and slow growth usually mean it needs food.
- Very dark, soft leaves with weak stems can mean too much nitrogen, especially in low light.
- Leaf edges browning can be caused by inconsistent watering, salt buildup, or heat. Flush the pot with plain water once, then resume feeding lightly.
If you use a granular slow-release fertilizer, apply it lightly and water consistently. Slow-release works well, but it’s easier to overdo in small pots, and it releases faster in heat.
A quick container trick that helps: Once a month, water deeply until you get plenty of runoff. That flushes extra salts from fertilizer that can build up and stress roots.
Spacing Kale Plants In Containers
Spacing affects leaf size, airflow, and how often you have to water.
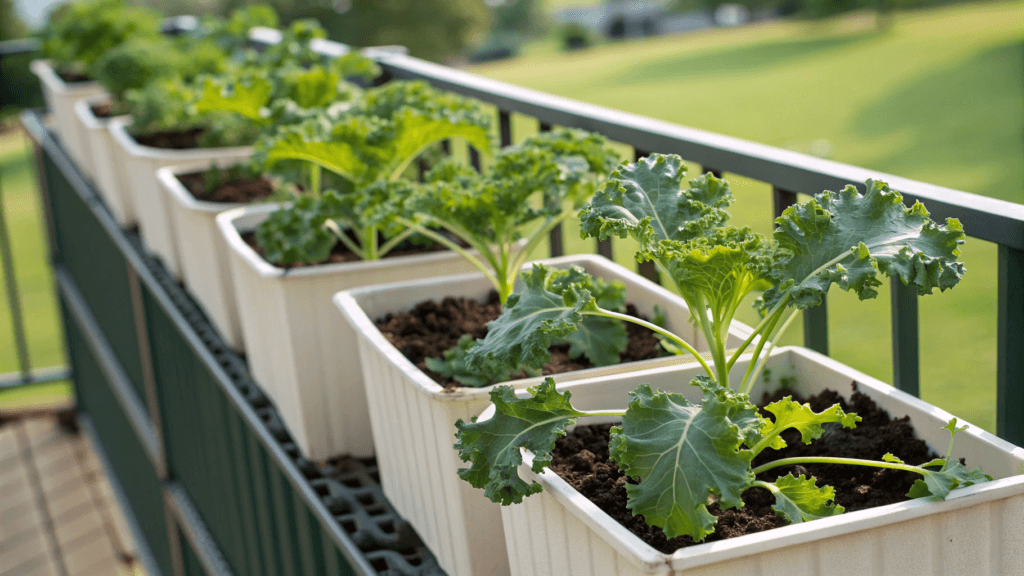
One Plant Per Pot Vs Multiple Plants
For full-size kale, one plant per 3-5 gallon pot is the simplest and usually the most productive long-term.
If you want multiple plants in a larger container, it can work well. Just remember, crowding leads to smaller leaves and more moisture competition.
In general:
- 1 plant: Best for long harvest, large leaves
- 2-3 plants in a big container: Good for steady picking, slightly smaller leaves
If your goal is “baby leaf” harvest (cutting young leaves often), you can grow more plants closer together. But for most home growers, mature-leaf harvesting from one healthy plant per pot is easier.
Spacing Adjustments For Larger Containers
In a long planter or raised container, aim for:
- Aim for 12 inches minimum between plants (closer to 16 inches if airflow is poor or humidity is high)
If you’re unsure, give more space. Kale can get surprisingly wide, and tight spacing makes it harder to spot pests early.
Common Problems When Growing Kale In Pots
Most container kale problems come down to water balance, pot size, and heat stress. Fix those, and many symptoms disappear.
If your leaves are getting holes, sticky tips, or curling while the plant is otherwise healthy, jump to Common Kale Pests.
Soil Drying Too Fast
This is the most common issue on balconies, especially with fabric pots or terracotta.
Signs you’re drying out too fast:
- Leaves droop in the afternoon but perk up in the evening
- Leaf edges get crisp or brown
- Growth stalls even though the plant looks “okay”
- The pot feels light a day after watering
Fixes that work:
- Move up to a larger pot
- If the surface dries fast, a 1-2 inch mulch layer helps a lot
- Water deeply in the morning, not a quick splash at noon
- If water runs straight through, the mix is too dry or too peat-heavy, rewet slowly, or soak the pot from the bottom for 20-30 minutes once to reset the soil
- Cluster containers together so pot sides shade each other and reduce wind drying
A simple moisture check, stick a finger 2 inches down. If it’s dry at that depth, water. If it’s still damp, wait.
Waterlogged Containers
Overwatering is usually poor drainage or a mix that holds too much water, not simply “watering too often.”
Signs of waterlogging:
- Yellowing leaves with soft texture
- Droop that doesn’t improve after watering
- Sour smell from the soil
- Fungus gnats
- Slow growth even in good light
Fixes:
- Make sure holes are open and not blocked by a saucer lip or compacted soil.
- Elevate the pot slightly so it drains freely.
- If the mix is dense, repot using a lighter potting mix and compost, consider adding perlite.
- Water only when the top couple of inches are starting to dry, not on a calendar schedule.
If roots have been sitting wet for a while, the plant may take a couple of weeks to bounce back once conditions improve.
Restricted Root Growth
Kale in a too-small pot will look “fine” at first, then stall.
Signs roots are restricted:
- The plant stops putting on new leaves at a normal pace
- Leaves stay smaller than expected
- It dries out quickly and needs water constantly
- It bolts earlier in warm weather
- When you tug the plant gently, it feels tightly anchored and crowded
Fix:
- Repot into a container at least one size up, ideally into the 3-5 gallon range.
- Water well after repotting and give it a couple of days of gentler sun if conditions are hot.
Root restriction is one of the reasons people decide “kale doesn’t like containers.” Usually, it’s just the pot.
Tips For Growing Kale On A Balcony Or Small Space
Balconies and patios have their own microclimates. Light bounces, walls radiate heat, and wind can be stronger than in a garden bed. A few small adjustments make a big difference.
Sun Exposure Basics (Without Indoor Lighting)
Kale grows best with:
- 6-8 hours of sun for best growth and leaf size (morning sun + afternoon shade if it’s hot)
- Morning sun and afternoon shade in hot climates or on heat-trapping balconies
If you have only 3-4 hours, kale can still grow, but expect slower growth and smaller leaves. In that case, keep spacing generous and avoid overfeeding; low light and high nitrogen can make soft, floppy growth.
Wind And Heat Considerations
Wind dries pots fast and can tear large kale leaves. Heat, especially reflected off walls, can push kale into stress and bitterness.
Practical fixes:
- Place pots where they’re protected by a railing, screen, or other plants.
- Use heavier containers or add weight so pots don’t tip.
- Shade the pot, not just the plant. Hot roots are a hidden problem on balconies.
- On heat-trapping balconies, a pot sitting on concrete can run much hotter than the air. Lifting it on pot feet helps roots stay calmer.
- In heat waves, water early and consider moving pots to a spot with bright shade for a few days.
If leaves start tasting stronger and tougher during hot weather, it’s often a sign of dry swings. Smoother watering and a bit of shade usually improve the next flush of leaves.
Moving Containers As Conditions Change
One of the best parts of container kale is mobility. Use it.
- In spring and fall, chase the sun.
- In midsummer, protect from harsh afternoon heat.
- When storms or strong winds hit, tuck pots against a wall or bring them closer to shelter.
- If pests show up, moving pots can help you isolate and treat them quickly.
Even rotating a pot every few days helps keep growth even and prevents a plant from leaning hard toward the light.
Conclusion
Growing kale in containers is straightforward once you respect what the plant needs: enough soil volume, reliable drainage, steady moisture, and regular feeding.
A 3-5 gallon pot, a light potting mix boosted with compost, and a simple routine of deep morning watering plus light fertilizer every couple of weeks will give you a long harvest window, especially in cooler weather.
On balconies, pay extra attention to wind and reflected heat, and don’t hesitate to move pots as conditions change. Container kale rewards consistency more than anything else.
Leave a Reply