Many gardeners discover that buying enough bagged mix to fill a large bed can cost more than the bed itself. You don’t need to fill the entire space with premium soil.
If you’re wondering how to fill a raised garden bed for cheap without sacrificing plant growth, this guide focuses specifically on filling raised beds for vegetable gardening, where healthy soil matters more than filling the entire bed with expensive bagged mixes.
Techniques like hugelkultur or adapted versions of it work beautifully, especially for deeper beds.
Related: How to Build a Raised Garden Bed on a Budget
Why Filling Raised Beds Costs So Much
One glance at the garden center price tags will tell you that soil adds up fast. A 4×8 bed that’s 12-24 inches deep can require dozens of bags if filled traditionally. And while buying bulk soil is cheaper, it still eats into your budget, especially if you’re starting multiple beds at once.
Think of your raised bed like a layered compost system. You’re creating a foundation that decomposes, feeds your soil, improves water retention, and drastically reduces the amount of soil you need to buy.
That’s why using a layered fill method instead of solid soil is the easiest way to cut costs without sacrificing plant health.
How to Fill a Raised Garden Bed for Cheap
Plants only need high-quality soil in the top 8–12 inches. Everything below that can be made up of organic materials that break down over time and help build long-term fertility.
Related content: Best Soil Mix for Raised Beds Recipes
Step 1 – Start with Coarse Materials at the Bottom
Start with coarse materials like logs, branches, or large sticks at the bottom. Leave some air gaps between pieces so water can move through easily.
Step 2 – Add a Mid-Layer of Organic Matter
Add mid-layer organic matter such as leaves, grass clippings, straw, or shredded cardboard.
Step 3 – Include Compost or Semi-Finished Compost
Include compost or semi-finished compost to boost nutrients and help layers settle.
Step 4 – Finish with 8-12 Inches of Quality Soil
Finish with 8-12 inches of quality topsoil or a soil/compost mix for planting.
Step 5 – Water Each Layer
Water layers as you build to encourage decomposition and reduce air pockets.
Step 6 – Top with Mulch
Top off with mulch to retain moisture and keep soil temperatures steady.
If you’re new to raised beds, start with our Raised Bed Gardening for Vegetables guide to understand layout, depth, and planting.
The Layering Method for Cheap Raised Bed Filling (Lasagna-Style)
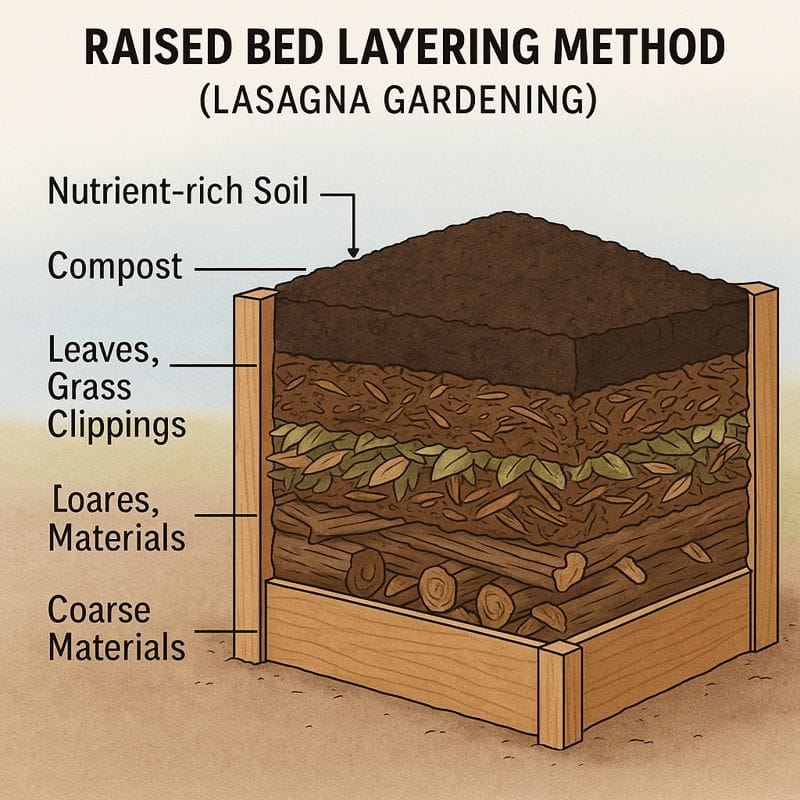
The raised bed layering method (sometimes called “lasagna gardening”) is one of the easiest and cheapest ways to fill a raised bed using materials you already have.
This is a practical way of how to fill a raised garden bed for cheap using a mix of materials arranged from coarse at the bottom to fine, nutrient-rich soil at the top. It’s incredibly flexible and works in almost any climate.
Basic Layering Structure
Here’s a simple, effective layout to follow (from bottom to top):
- Coarse materials (large logs, broken branches)
- Medium yard debris (sticks, bark, trimmed stems, wood chips)
- Organic fill (leaves, grass clippings, straw, compostables)
- Screened compost or topsoil mix (8-12 inches)
Why It Works
- It reduces soil cost by 40-70%.
- The lower layers slowly break down, feeding the soil for years.
- It improves drainage and moisture retention at the same time.
- It warms the soil slightly as decomposition happens, great for early planting.
A Step-by-Step Filling Example
Let’s say you have a 24-inch-deep bed:
- Bottom 8-10 inches: logs and coarse wood
- Next 6-8 inches: smaller sticks, leaves, grass, shredded cardboard
- Top 8-10 inches: high-quality soil mix
This method is perfect if you don’t have a huge amount of compost yet or if you’re working with multiple beds.
Tip: Water each layer as you build. Moisture jump-starts decomposition and helps the materials settle so you don’t end up with large air pockets.
Hugelkultur Concepts for Cheap Raised Bed Filling
If you’ve ever heard of a hugelkultur raised bed, you’ll recognize parts of the layering method. Hugelkultur (a German term meaning “mound culture”) is a traditional technique where gardeners build beds around buried wood.

In a raised bed, you can adapt hugelkultur by placing wood and coarse organic material at the bottom, then building up with softer materials and soil on top.
It’s especially useful for filling large raised beds cheaply.
This Method Typically Includes
- Large logs or chunks of old wood placed at the bottom
- Medium-sized branches, sticks, bark, or pruned limbs layered above
- Leaves, grass clippings, straw, and other soft yard waste
- A top layer of compost and quality soil for planting
Why Wood Works in Raised Beds
Wood acts like a sponge. As it breaks down, it:
- Holds moisture, reducing the need for frequent watering
- Feeds beneficial microbes and fungi
- Creates long-lasting organic matter
- Fills volume without cost
Large logs decompose slowly, often lasting 5-10 years depending on species.
Best Wood Materials to Use
You don’t need anything fancy. Use what you have:
- Fallen logs
- Branch piles
- Pruned limbs
- Rotten or partially decomposed wood
- Wood chips (as a mid-layer, not the main bulk)
Avoid Fast-Decaying Woods at the Base
Some soft woods (like poplar or willow) decompose quickly, which can cause the bed to sink sooner. They can still be used, just mix them with harder woods so you get long-term structure.
How Hugelkultur Helps in Hot or Dry Climates
Gardeners in dry regions love hugelkultur because the buried wood retains water so well. After a few months, you’ll notice your soil staying moist longer, even during peak summer heat.
What About Nitrogen Tie-Up?
A common misconception is that wood “steals” nitrogen from soil. This can happen on the surface when fresh wood is incorporated, but in deep raised bed layers, it’s not a concern, the soil layer above provides plenty of nutrients. As long as the top 8-12 inches contain good soil, your plants will thrive.
Cheap Raised Bed Filling Methods Compared
There’s no single “right” way to fill a raised bed. Here’s how common budget-friendly methods compare so you can choose what works best for your garden and materials.
| Method | Cost | Best For | Pros | Cons |
|---|---|---|---|---|
| Layering (lasagna method) | Very low | Most raised beds | Uses free yard waste, builds soil over time, flexible | Settles in first year, needs some planning |
| Hugelkultur-style (logs at bottom) | Very low | Deep beds & dry climates | Excellent moisture retention, long-lasting organic matter | Not ideal for very shallow beds |
| Solid bulk topsoil | Medium | Quick setup | Simple, no layering needed | More expensive, can be poor quality if not screened |
| All bagged mix | High | Small beds | Easy, consistent texture | Most expensive option, heavy to move |
| Compost-heavy fill | Medium | Intensive veggie beds | Very fertile, great for heavy feeders | Can be too rich or compact if used alone |
What NOT to Use When Filling a Raised Bed
Saving money is great, but not if it comes at the cost of garden health or safety. A raised bed is essentially a food-growing environment, so certain materials shouldn’t be buried inside it.
Avoid These Materials Completely
- Pressure-treated lumber
Modern treated wood is safer than older versions, but still not ideal inside the soil in which your food grows. Use it for bed walls if needed, but not as filler.
- Painted or stained wood scraps
Paint can contain chemicals that leach into the soil.
- Plywood, MDF, or particle board
These contain glues and resins, not suitable for garden soil.
- Weed-contaminated soil or sod
This introduces invasive seeds or roots that are tedious to remove.
- Glossy cardboard or printed materials
Stick to plain, brown cardboard only.
- Pet waste or contaminated compost
These can contain pathogens harmful to humans.
Materials That Are Safe but Should Be Used Sparingly
- Fresh manure, only use if composted, to avoid burning plant roots
- Large amounts of wood chips on top can hinder seed germination
- Stone or rubble reduces water retention and adds weight without benefit
When in doubt, ask: Will this material break down cleanly and feed the soil?
If the answer is no, skip it.
How Much Soil Do You Really Need? (Depth & Volume)
Most gardeners overestimate how much premium soil they need. In reality, you can often fill half or more of the bed with free materials and only use purchased soil in the upper layer.

Most vegetables grow beautifully in 10-12 inches of quality soil, sometimes less.
General Depth Guidelines
- Herbs: 6-12 inches (depending on the herbs)
- Leafy greens: 8-12 inches (depending on the variety)
- Root vegetables: 12-24 inches
Even if your bed is 24 inches deep, only the upper portion needs to be premium soil.
How to Estimate Soil Volume
Use the simple formula:
Length × Width × Depth = cubic feet
Then divide cubic feet by 27 to convert to cubic yards (for bulk soil).
Example for a 4×8 bed with 10 inches of soil:
- 4 ft × 8 ft × 0.83 ft = 26.56 cubic feet
- 26.56 ÷ 27 ≈ 1 cubic yard of soil
When using the layering method, you usually only need half this much purchased soil.
Why Raised Bed Soil Settles (and What to Do About It)
In the first year, layered beds naturally settle as the lower materials decompose. This is normal. You may need to top up an inch or two of soil each spring; that’s part of maintaining a living garden bed.
Instead of seeing settling as a problem, think of it as part of the natural composting process. Just top off with a little fresh soil or compost each year.
Long-Term Soil Maintenance for Layered Raised Beds
Filling a raised bed cheaply is only step one. Keeping the soil productive for years is step two, and it doesn’t have to cost much.
Add Organic Matter Regularly
Each year, mix in:
- Compost
- Aged manure
- Leaf mold
- Worm castings
This keeps soil structure fluffy and nutrient-dense.
Mulch the Top Layer
A 2-3-inch layer of mulch:
- Conserves moisture
- Regulates temperature
- Reduces weeds
- Adds organic matter as it breaks down
Good mulch options include shredded leaves, straw, grass clippings, or wood chips (kept at the surface).
Use Crop Rotation and Companion Planting
Plants draw on different nutrients, so rotating crops keeps the soil balanced. Pairing complementary plants (like basil and tomatoes) also boosts plant health without extra fertilizer.
Feed the Soil, Not the Plants
Raised bed gardening thrives when the soil is alive. Instead of synthetic fertilizers, rely on natural nutrient cycles supported by compost, organic amendments, and mulch. This creates a stable ecosystem that’s easier to maintain long-term.
Practical Tips From Real Raised Bed Gardening
Layered raised beds improve every year. In the first season, expect some settling and uneven moisture as materials break down.
By the second year, the soil becomes more stable, holds water better, and needs less frequent feeding. Keeping notes on how fast your bed dries out and which layers break down fastest helps you refine the system over time.
Conclusion
Filling a raised bed for cheap doesn’t mean compromising on soil quality, far from it. By combining layering techniques with hugelkultur-inspired materials, you can cut costs dramatically while building a living, nutrient-rich foundation that benefits your garden for years to come.
Just remember the core principles:
- Save the high-quality soil for the upper 8-12 inches.
- Fill the rest of the bed with logs, sticks, leaves, compostables, and other clean organic materials.
- Avoid anything treated, painted, or contaminated.
- Maintain the soil each year with mulch and compost.
With the right approach, even a deep raised bed becomes affordable, eco-friendly, and incredibly productive. Whether you’re gardening on a budget or simply want healthier soil, these methods offer a simple and sustainable solution.

Leave a Reply