If you want to grow kale from seed, sow kale seeds shallowly (about 1/4 inch deep), keep the seed bed evenly moist (not soggy), give it steady light once it sprouts, and aim for cool-to-mild temperatures for the strongest seedlings.
In practice, most kale seed failures I see come down to just a few things: planting too deep, letting the seed zone dry out during germination, or not providing enough light after seedlings emerge.
Learn how to grow kale from seed. This guide covers planting depth, germination time, early seedling care, and common mistakes to avoid.
The goal is to help you get sturdy, healthy seedlings that are ready for the next stage when the time comes. Once seedlings are established, ongoing care like spacing, feeding, and harvesting is covered in how to grow kale.
What You Need Before Planting Kale Seeds
You don’t need fancy equipment to start kale from seed, but a few basics make the difference between thin, struggling seedlings and sturdy ones.
Seeds
- Fresh seeds. Kale seed can stay viable for a few years if stored cool and dry, but germination drops over time.
- Buy more than you need. You’ll thin or select the strongest seedlings later, and it’s normal to lose a few.
- Do a quick viability check if you’re unsure: Place 10 seeds in a damp paper towel, seal in a bag, and keep warm. If fewer than about 7 sprout in a week, sow thicker or replace the packet.
Soil Or Seed-Starting Mix
For the earliest stages, you want a growing medium that is:
- Fine-textured, so tiny seeds make good contact
- Well-draining, so roots get oxygen
- Lightly fertile, too rich isn’t helpful early on
A seed-starting mix is easiest because it’s designed for this. If you’re using garden soil, it often clumps, crusts, or drains unevenly; those issues can stall germination or cause seedlings to collapse.
Light And Moisture Basics
Before you plant, it helps to understand what kale seeds actually need:
- Moisture, oxygen and the right temperature are what trigger germination.
- Light is not required for the seed to sprout, but light is essential the moment seedlings emerge. Without enough light, they stretch and weaken fast.
A simple desk lamp or shop light placed close to seedlings is often more reliable than a sunny window alone.
How to Grow Kale From Seed
Planting kale seeds is mostly about getting a few small details right. If the seeds are planted shallowly, kept evenly moist, and left undisturbed, they usually sprout without much trouble.

Follow these steps to plant kale seeds correctly and get even, reliable germination:
Step 1: Pre-moisten your mix. Put mix in a bowl or bucket, add water slowly, and stir until evenly damp.
Why this works: Dry mix can repel water at first, so watering after planting sometimes creates channels that move seeds around or leave dry pockets.
Step 2: Fill your tray or bed and level it. Don’t pack it down hard. Just tap or press lightly to remove big air gaps.
Step 3: Smooth and lightly firm the surface. Kale seeds are small, and a lumpy surface leads to uneven planting depth.
Optional but helpful: If your mix is very fluffy, press the surface gently with a flat board or your palm.
Why this works: Better soil contact helps seeds absorb water evenly, which improves germination.
Step 4: Plant kale seeds about 1/4 inch deep. Cover lightly and gently press the soil for good seed contact.
Step 5: Water gently after planting. Mist or sprinkle until the top 1/2 inch of soil is evenly moist.
Reduce surface drying during germination (optional but helpful) – Covering trays with a humidity dome, loose plastic wrap, or a light cover helps prevent the surface from drying during germination. Remove the cover as soon as seedlings emerge so air can circulate and stems stay strong.
Avoid heavy streams that dig holes, bury seeds too deeply, or wash them into clumps.
Step 6: Keep the seed zone moist and provide light immediately once seedlings emerge.
Too deep is one of the most common reasons kale doesn’t show up. The seed has limited stored energy. If it has to push through too much soil, especially crusted soil, it can stall out.
Spacing And Seed Density
There are two good approaches early on. Choose based on how you like to manage seedlings.
Option 1: Sow thinly (less thinning later)
- Drop seeds about 1 inch apart in rows or across the surface.
- This reduces crowding and makes it easier to spot strong seedlings.
Option 2: Sow a little thicker (insurance against gaps)
- Sprinkle a few extra, then plan to thin.
- This is useful if you’re using older seed or conditions are less predictable.
If you sow too densely, seedlings compete for light immediately and stretch. Crowding also keeps the surface wetter, which can invite seedling diseases.
A quick density check:
- If seedlings come up so close their leaves overlap right away, it’s too dense.
Watering After Planting
Right after sowing, your job is to settle seeds into contact with the mix without washing them deeper or sideways.
If you’re watering a larger area, use a watering can with a rose (shower head) and water gently.
After watering, look closely at the surface. If you see seeds exposed, add a light dusting of mix to cover them; don’t push them down.
If possible, bottom watering during germination can help keep moisture even without disturbing seeds. Set trays in shallow water briefly and remove once the surface becomes evenly damp.
Growing Kale From Seed Indoors Vs Outdoors
Kale can be started either way, and both can work well. The “best” method is the one you can keep consistently moist and well-lit.
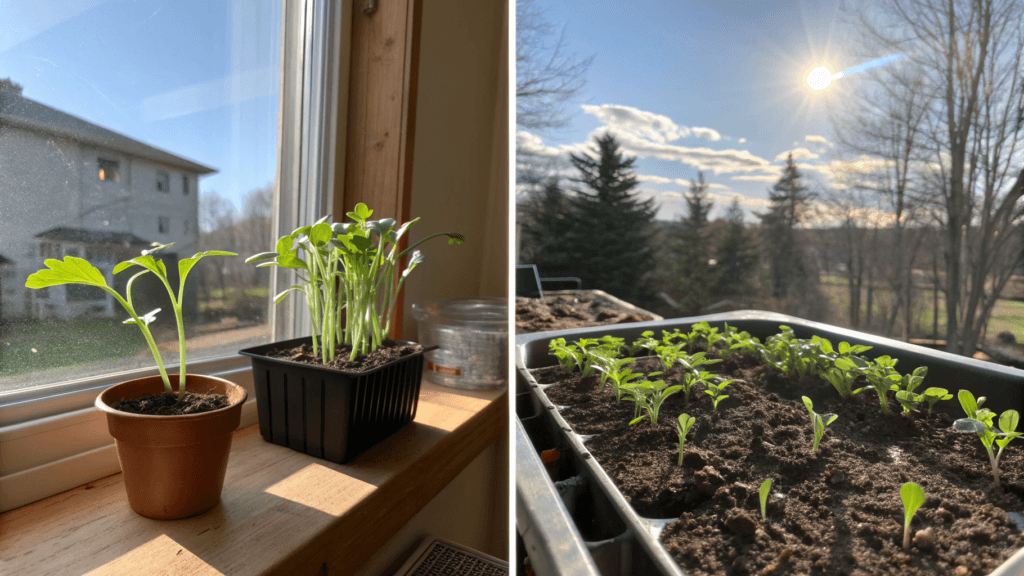
Starting Kale Seeds Indoors
Pros
- You can control moisture and temperature more easily.
- Germination is usually more even.
- You can protect seedlings from heavy rain, wind, or sudden cold snaps.
Cons
- Light is the make-or-break factor. Many indoor seedlings stretch because the windows aren’t bright enough.
- Overwatering is more common indoors because trays drain slowly and evaporation is low.
Indoor success depends on one big thing:
- Strong light close to the seedlings as soon as they emerge. If you can’t provide that, outdoor direct sowing is often easier.
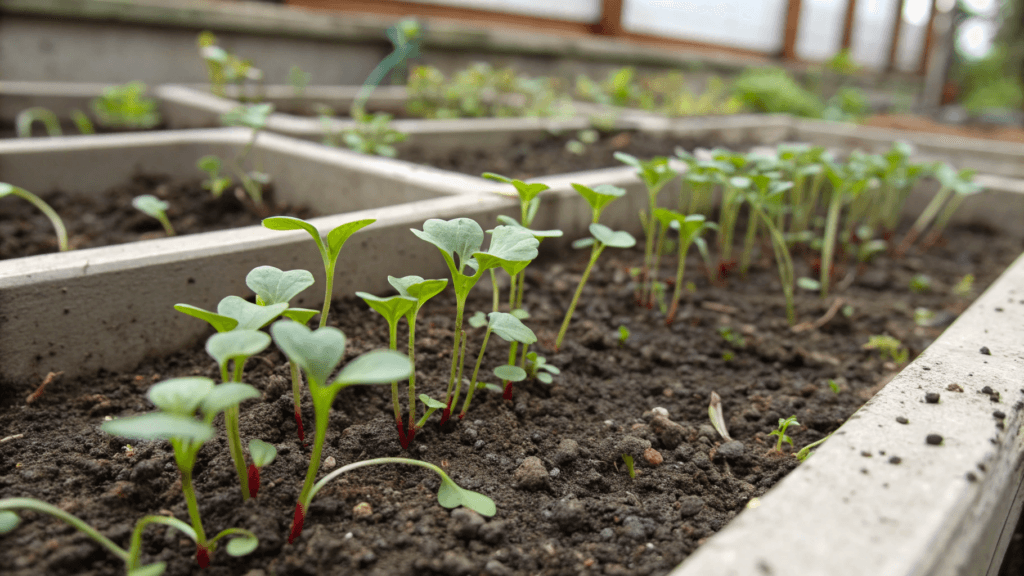
Direct Sowing Kale Seeds Outdoors
Direct sowing means planting seeds where they will sprout and grow as seedlings right in the soil.
Kale seeds can germinate in cool soil, but results are most consistent when soil temperatures stay between about 60-75°F (15-24°C). Germination slows noticeably below this range and becomes less even when surface soil heats and dries too quickly.
Why direct sowing can be simpler
- Sunlight is stronger and more balanced than most indoor setups.
- The soil environment is more natural, so seedlings often grow sturdier.
What to watch outdoors
- The surface dries faster, especially in wind or sun.
- Heavy rain can crust soil or bury seeds deeper than intended.
- Birds can disturb freshly sown areas.
A practical outdoor method for better results:
- After sowing and watering, cover the area with a light layer of fine compost or sifted mix. It reduces crusting and helps hold moisture at the surface.
Which Method Is Better For Beginners?
If you can do one thing well, choose based on that:
- If you can provide steady moisture and strong light, indoor starting works fine.
- If you’re more confident keeping a small outdoor patch evenly moist, direct sowing is often more forgiving because light is not a limiting factor.
For many beginners, the biggest indoor hurdle is light. Kale seedlings that don’t get enough light quickly become thin and floppy, and they never fully catch up.
Kale Seed Germination Time And What To Expect
Kale seeds don’t take long to sprout, but the timing can vary depending on conditions.
How Long Does Kale Take to Germinate
Most kale seeds germinate in 5 to 10 days under good conditions. You might see the first sprouts in as little as 2-3 days when temperatures are right, then the rest follow over the next several days.
Faster sprouting usually occurs when moisture stays consistent, and soil temperature remains stable day and night.
Ideal Temperature For Germination
Kale is a cool-season crop, but germination still has a sweet spot.
- Ideal Range: 60-75°F (15-24°C)
Beginner-friendly temperature tip:
- If you’re struggling with slow germination, check whether the seed zone is actually staying within that range, especially at night.
Below ~50-55°F (10-13°C), germination often slows; above ~80°F (27°C), the surface can dry faster and germination may become less even.
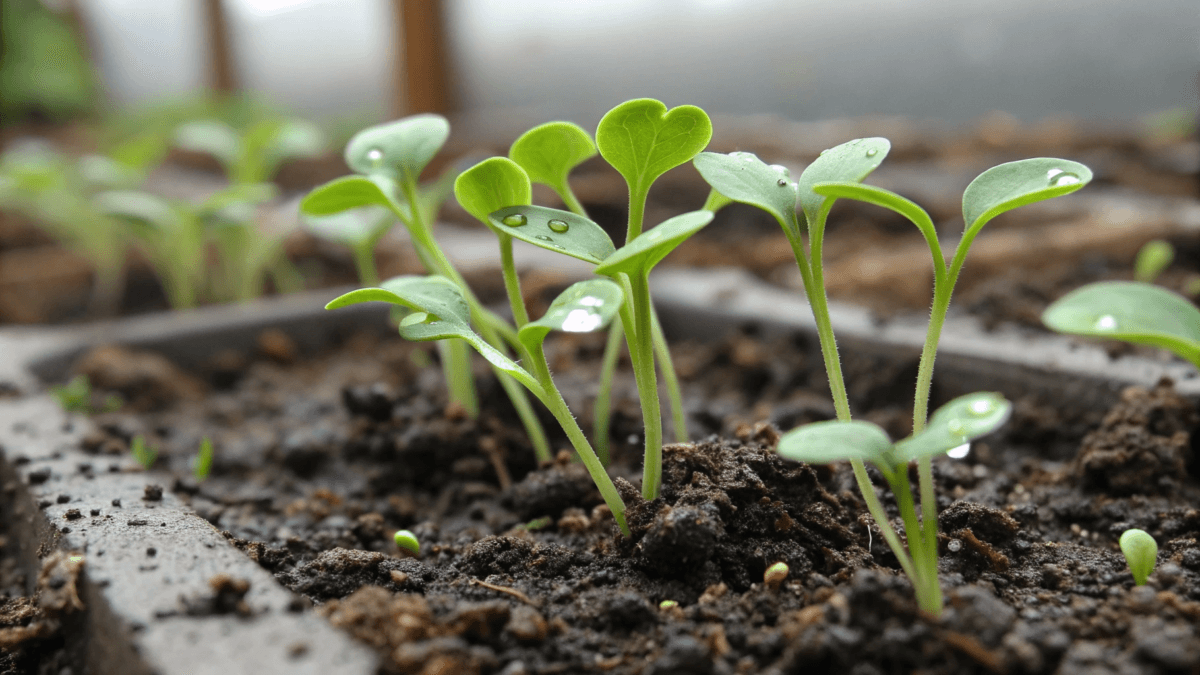
What Kale Seedlings Look Like When They Sprout
Kale seedlings emerge with:
- Two smooth seed leaves (cotyledons) that are rounded or slightly oval.
- A thin stem at first that should thicken quickly with good light.
- The first true leaves come next and will start to show kale’s more characteristic shape (often slightly toothed or textured depending on variety).
At this stage, seedlings tolerate light handling, gentle airflow, and slight drying between waterings much better than during germination.
Seedlings that are tall and leaning within a day or two of emergence usually need more light.
If you’re using older packets, run them through our Seed Viability Calculator before you plant so you don’t end up with empty spots.
Timeline From Seed To First True Leaves
A typical early timeline (in decent conditions):
- Day 0: Sow seeds
- Day 3-8: Germination and emergence
- Day 7-14 (after sowing): Cotyledons fully open and seedlings begin steady growth
- Day 10-21: First true leaves appear (timing depends on light, temperature, and moisture)
In cooler conditions, true leaves may take closer to 2-3 weeks to appear; with warm soil and strong light, they often show up sooner.
A key point many beginners miss:
- True leaves don’t show up on a schedule like clockwork. If light is weak or seedlings are stressed, they can pause.
When Kale Seedlings Are Established
In the early stage, I consider kale seedlings “established” when:
- They have at least 2-3 true leaves
- Stems look upright and thicker, not threadlike
- Growth is steady, and new leaves appear regularly
Common Kale Seed-Starting Mistakes (And How To Avoid Them)
These are the problems I see most often, and they’re all fixable once you know what to look for.
Planting Too Deep
This is the single most common mistake with kale seeds, especially when gardeners are used to planting larger seeds like beans or peas.
Signs
- No sprouts after a week even though conditions seem fine
- You dig gently and find swollen seeds or sprouts that never reached the surface
Fix
- Sow at 1/4 inch and keep the top layer fine and lightly pressed.
- Avoid mulching heavily over newly sown kale seed.
Pressing soil too firmly over small seeds can be just as problematic as planting too deeply, especially in mixes that crust when watered.
Overwatering Or Drying Out
Signs of overwatering
- Sour smell in the mix
- Green algae on the surface
- Seedlings fall over at the base (damping-off risk)
Signs of drying out
- Seedlings germinate unevenly
- Seed coats stick to leaves
- Sprouts appear, then stall
Fix
- Keep moisture even, not extreme.
- Water gently and check the seed zone with a finger.
- Aim for a damp, airy mix, not mud.
A quick moisture test:
- Press the surface lightly. If water shines or pools, it’s too wet. If it feels dusty under the top layer, it’s too dry.
Not Enough Light
Signs
- Seedlings stretch tall and bend toward a light source
- Pale color and thin stems
Fix
- Provide strong, close light immediately after emergence.
- Rotate trays if using a window so seedlings don’t lean.
Why this works:
- Light drives compact growth. Without it, seedlings “reach” for brightness, spending energy on stem length instead of leaf and root development.
Poor Soil Contact
Signs
- Patchy germination even with fresh seed
- Seeds that dry out quickly or wash into corners
Fix
- Pre-moisten mix, sow, then press lightly so seeds touch the mix.
- Water gently so seeds stay put.
Troubleshooting Poor Germination
If kale seeds aren’t sprouting well, don’t assume you “did something wrong.” Usually, it’s one or two correctable factors.
Why Kale Seeds Don’t Sprout
Work through this checklist in order:
- Depth problem. If planted deeper than 1/4 inch, sprouts may not break through, especially if the surface crusts.
- Moisture inconsistency. Kale seeds need continuous moisture during germination. Even one dry-out can kill the tiny emerging root.
- Temperature too cold or too hot. Cold slows everything down; excessive warmth can lower germination and encourage fungal issues.
- Old or poorly stored seed. Kale seed usually stays viable for about 3-5 years if kept cool and dry. Seed stored in heat or humidity can lose viability much faster.
- Crusting or compaction. A hard surface can physically block seedlings. This is common with heavy soils or when watering creates a “skin” on top.
- Disease pressure in overly wet conditions. A very wet, stagnant mix can rot seeds before they sprout.
In most cases, poor germination traces back to depth or moisture issues rather than seed quality.
A simple diagnostic move:
After 7-10 days with little activity, gently dig where you planted.
- If seeds look unchanged and dry: Moisture issue.
- If seeds are swollen or split but stuck: Depth/crusting issue.
- If seeds are mushy: Too wet or a disease issue.
What To Do If Germination Is Uneven
Uneven germination usually means seeds experienced different conditions in the same tray or bed.
Common causes:
- The surface dried more at the edges than in the centre
- Uneven sowing depth
- The mix wasn’t evenly moistened before planting
- The light heat source warmed one side more than the other
Practical fixes that work:
- Bottom-water carefully (if possible) so moisture rises evenly through the mix rather than splashing the surface.
- Thin the strongest seedlings and don’t worry about perfection, kale is forgiving once it’s growing.
- If bare spots bother you, re-sow just those areas shallowly and keep them moist. (Mark the re-sown spots so you don’t overwater the whole tray.)
Tips For Strong Kale Seedlings
These are the habits that consistently produce sturdy kale starts.
Focus On Even Moisture, Not Constant Wetness
- Check daily, sometimes twice daily, in dry conditions.
- Water when the top layer is approaching dry, not after it’s bone dry.
Quick routine
- Morning: Check moisture with a fingertip
- Water lightly if needed
- Evening: Check again if conditions are warm, windy, or very dry
Give Seedlings Strong Light As Soon As They Emerge
The moment you see green, light matters more than anything else.
- Keep the light close enough that the seedlings stay compact.
- If they’re leaning, they need brighter light or a better position.
Seedlings generally perform best with long, consistent light exposure each day rather than brief periods of intense light.
Keep Air Moving Gently
Stagnant air and wet mix are where many seedling problems start.
- A gentle breeze (even just natural airflow) helps stems strengthen and keeps the surface from staying overly wet.
Don’t Crowd Them Early
Crowding causes:
- Stretching
- Weak stems
- Higher disease risk
If you sowed thickly, thinning early is helpful. You’re not “wasting plants”, you’re giving the remaining seedlings room to grow properly.
Watch For The First True Leaves
Cotyledons get the plant started. True leaves tell you things are going well. Once you see true leaves forming, you’re past the most fragile stage.
Conclusion
Growing kale from seed is mostly about patience and consistency during the first couple of weeks. When seeds are planted at the right depth, kept evenly moist, and given enough light once they sprout, most of the hard work is already done.
Early growth can seem slow, but that’s normal. Once seedlings develop true leaves and begin growing steadily, they become much more resilient.
Getting through germination and early seedling stages successfully gives kale a strong start and makes everything that follows easier.
Once seedlings reach this point, kale becomes one of the more forgiving greens to grow, and most early problems fade quickly with steady care.
Leave a Reply